

Today I’m going to be teaching you about all of the different components that are necessary to assemble a DIY RV solar setup.
This particular blog post is going to be a very basic parts identification blog post where we will be doing it in a 101-level fashion on what all of the individual solar components are.
For some of the components, you will need to do some more clarification for the size you will need.
Like, how do I size my solar controller to work with my solar panels?
Or, what is the size of wires will I need in my solar setup?
We are going to dive into each of the
Let’s dig in and see how it goes.
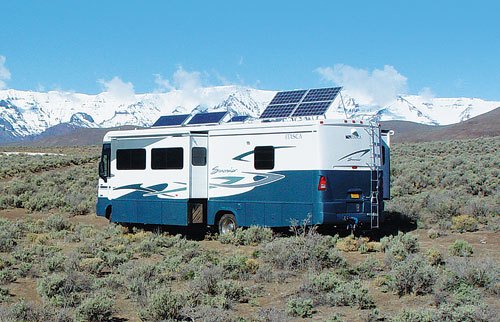
Solar Panels
Solar Panels are the most obvious component in a solar system. Panels are used to gather solar energy from the sun. The energy is sent down to the solar controller.
Then that power is sent to recharge the batteries.
There are three types of solar panels.
Monocrystalline, Polycrystalline and Amorphous Solar panels.
Amorphous technology is seen in small solar panels, like the ones used in calculators or garden lamps.
Although amorphous panels are increasingly used in larger applications. They are made by depositing a thin film of silicon onto a sheet of another material such as steel.
The panel is formed as one piece and the individual cells are not as visible as in other types of solar panels.
Monocrystalline solar panels are thought of as a premium solar product. To make solar cells for monocrystalline solar panels, silicon is formed into bars and cut into wafers. These types of panels are called “monocrystalline” to indicate that the silicon used is single-crystal silicon.
The cell is composed of a single crystal, the electrons that generate a flow of electricity have more room to move.
As a result, monocrystalline panels are more efficient than their polycrystalline counterparts.
Polycrystalline solar panels are made from silicon. I
Polycrystalline solar panels are referred to as “multi-crystalline,” or many-crystal silicon. There are many crystals in each cell, there is to less freedom for the electrons to move.
The main difference between the two is their efficiency.
Let’s take a look at these two solar panels that are made from the same company.
The Renogy polycrystalline 100 W Panel
| Specifications | |
| Maximum Power: 100W | Maximum System Voltage: 600V DC (UL) |
| Optimum Operating Voltage (Vmp): 17.8V | Open-Circuit Voltage (Voc): 22.4V |
| Optimum Operating Current (Imp): 5.62A | Short-Circuit Current (Isc): 5.92A |
| Weight: 16.5 lbs | Dimensions: 39.7 x 26.7 x 1.4 inches |
The Cost of this panel is $ 125.99
The Renogy monocrystalline 100 W Panel
| Specifications | |
| Maximum Power at STC: 100W | Maximum System Voltage: 600V DC (UL) |
| Optimum Operating Voltage (Vmp): 16.4V | Open-Circuit Voltage (Voc): 21.1V |
| Optimum Operating Current (Imp): 6.1A | Short-Circuit Current (Isc): 6.6A |
| Weight: 14.3lbs | Dimensions: 41.6 X 20.7 X 1.38 In |
The Cost of this panel is $ 127.99
You can see by the specs that the monocrystalline panel makes more power than the polycrystalline panel. Yes, there is a slight price difference between the two. You may be able to find different prices on the internet. These are the prices I got from Renogys Website.
Another thing, I’ve seen in articles and videos talking about how these two technologies of panel function in terms of shading or cloudy days.
Now, there have been a lot of opinions given on this, and I have yet to see anything really, really conclusive one way or the other, which leads me to believe that perhaps neither one does a very good job in the shade, and perhaps you need sunlight for solar panels to work.
Since roof space on camper vans is incredibly limited, go with the monocrystalline solar panels. You’ll get more power out of the same space leaving more room for vent fans.
The polycrystalline will also be fine if you are trying to save pennies. When spending all this money to build a system isn’t the place to skimp as it’s going to likely be one of the more difficult components to replace on own the road.
Save your money and do it right, do it once.
Charge Controller
The charge controller takes the solar power from the solar panels and then converts it into a form of more organized and useful power. The power is coming from the solar panels at varying voltages, anywhere from 16 volts to potentially in the hundreds of volts, depending on the setup.
The charge controller regulates that voltage down to the 12 to 15 volts ballpark if you’re on a 12-volt battery bank, to properly charge the said battery bank.
There are two main types of charge controllers on the market, MPPT and PWM.
Pulse width modulation (PWM) is a powerful technique for controlling analog circuits with a microprocessor’s digital outputs. PWM is employed in a wide variety of applications, ranging from measurement and communications to power control and conversion
Maximum Power Point Tracking (MPPI) is an algorithm that included in charge controllers used for extracting maximum available power from PV module under certain conditions.
The voltage at which PV module can produce maximum power is called ‘maximum power point’ (or peak power voltage). Maximum power varies with solar radiation, ambient temperature, and solar cell temperature
Let’s talk about the advantages and disadvantages of each of these
PWM charge controllers are the more basic of the two charge controllers. What they do is it will match the solar array voltage to the voltage required to charge the batteries.
This will be depending on what state of charge in the batteries. How it works is turning on and off that’s why it’s called pulse width modulated it turns on pulsates on and when it is on it is sending energy to the batteries. When it’s off it is monitoring the capacity of the batteries to make sure that it’s properly charging the batteries.
MPPT charge controllers are the more advanced and feature-rich of the two charge controllers. Now keep in mind both of these charge controllers are going to prevent overcharging of your battery bank as well as unnecessary discharge of the battery banks so that energy can flow really only in one direction.
With the MPPT charge controller, the added functionality comes with the ability to electronically track and deliver the most optimal amount of energy from the solar array to the battery bank.
Just like the PWM charge controller the MPPT charge controller can monitor to the capacity of the batteries. Then match the necessary voltage needed from the solar array to charge the batteries. This is depending on what the state of charge is.
Now that is why it’s more optimal is the fact that it can account for differences in voltages coming from the solar array and then manipulate the number of amps or current that’s sent to the batteries. By doing this the batteries are actually getting charged more during the same amount of time as with a PWM charge controller.
The advantages and the disadvantages
Three different categories I’m going to talk about it’s going to be the efficiency of each charge controller, the functionality of each charge controller, and then as always the price.
When it comes to efficiency the PWM controller as you may have guessed is less efficient than the MPPT charge controller.
This has to do with the fact that it doesn’t have the electronic tracking capabilities and the ability to optimize the amount of energy going to the batteries.
What this offers to the MPPT charge controller is the ability to increase the efficiency by anywhere from 10 to about 40 percent depending on external variables such as temperature charging capacity of the battery.
There are many variables on top of that when it comes to functionality MPPT charge controllers.
Yet again they’re able to accommodate for differences in voltages between the solar array and the battery banks.
If you have a 24 volt solar array charging a 12 volt battery bank you need to have an MPPT charge controller.
If you have a 12 volt array and a 12 volt battery bank you can get away with having a PWM charge controller.
Another added functionality benefit to MPPT charge controllers is the ability to detect and modify the charge going to the batteries when there is a DC load or an appliance attached directly to the battery.
So if you have some sort of appliance or anything that’s attached the positive and negative side of the battery and it’s being powered directly from that battery the charge controller can monitor it
Then compensate for the amount of charge needed to charge both battery bank as well as power that DC appliance.
The last category I’m going to talk about is the pricing differences between these two charge controllers.
The MPPT charge controller can be nearly double the of PWM charge controllers.
Now this has to do a lot with the fact that there’s added functionality and efficiency benefits, but it also has to do with the fact that there’s a higher manufacturing cost when it comes to MPPT charge controllers.
When it comes to the initial cost it may look like PWM charge controllers are the advantage, but you have to consider the fact that they are less efficient.
If you’re trying to gain the maximum amount of power from a small system if you’re limited on space or anything like that you definitely need to go with an MPPT charge controller.
If there’s any voltage differences from your solar array to your battery bank you need the MPPT charge controller to increase the efficiency.
Oftentimes the differences in price between these two charge controllers can be made up in having to buy less of the other components like less solar panels and less batteries. To account for the differences in efficiencies between these two charge controllers.
Okay now that I’ve got the advantages and disadvantages out of the way I’m going to go ahead and show you guys how to get a good idea of what size charge controller you need for your system.
When it comes to sizing for a charge controller it’s a lot easier than you might think.
What you need to do is take the total wattage of your solar array.
Here we will say 600 watts and then you’re going to divide that by the voltage of your system. We are wired in 12-volt configuration.
What we do is we take 600 watts and you divide that by 12 volts. That is going to give you a 50-amp recommendation on the size of the charge controller.
So, our charge controller needs to be at least 50 amps awesome.
Batteries
Batteries are simply like a storage tanks for power. They store the power that the solar panels and charge controller have made.
Then when you are ready to use the power to run computers, charge phones, brew coffee, whatever may have use for.
There are three main types of batteries on the market.
- Lead Acid
- AGM
- Lithium
The lead acid battery require maintenance and they vent corrosive hydrogen gas.
The basic lead acid battery chemistry has been the workhorse of the automotive engine start and traction vehicle industries for a long, long time. When used in engine start applications, the batteries are referred to by the acronym SLI, which stands for Starting Lighting & Ignition. Even with all the new, exotic developments in battery technology within the last decade, lead acid still offers one of the most economic alternatives for many applications.
AGM or Absorbent Glass Mat batteries.
In AGM batteries (also called starved electrolyte), there is a thin ultra-fine fiberglass mat sandwiched between the plates that are saturated with battery acid to about 95% of what they can hold. This mat is then packed in between the plates and slightly compressed, then welded/soldered in place.
Lithium batteries
Lithium Iron Phosphate (LiFePO4) is an extremely stable lithium chemistry when compared to almost all other lithium chemistries. The battery is assembled with a naturally safe cathode material (iron phosphate). Compared to other lithium chemistries iron phosphate promotes a strong molecular bond, which withstands extreme charging conditions, prolongs cycle life, and maintains chemical integrity over many cycles. This is what gives these batteries their great thermal stability, long cycle life, and tolerance to abuse. LiFePO4 batteries are not prone to overheating, nor are they disposed to ‘thermal runaway’ and therefore do not over-heat or ignite when subjected to rigorous mishandling or harsh environmental conditions.
Lithium batteries are significantly more expensive up front, but they’re cheaper over the long run.
It’s lighter, it’s more powerful, you get bigger bang for your buck in the long run.
Inverter/Charger Combo Units
Now, I really like
Your battery stores power at 12 volts. If you have something, say, a coffee maker or an instant pot, you’ll need 110 volts a normal household plug to get your power.
The inverter takes the 12-volt power stored in the batteries and converts it into 110-volt power so you can power your household appliances.
Inverters come in a few different types.
The square wave inverter is a type of inverter which converts solar DC power to AC power. The squarewave inverter is simpler in design and more efficient than a sine wave inverter. However, the squarewavewill not be appropriate for some loads, because the large harmonic content can cause interference.
- Modified Sine Wave
In pure sine wave inverters, the AC power produced by the inverter very closely matches an actual sinewave. Since producing a modified sine wave is a much simpler process than creating a pure sinewave, modified sine wave inverters are typically much less expensive.
- Pure Sine Wave
These inverters use more sophisticated technology to protect even the most sensitive electronics. Pure sine wave inverters produce power which equals – or is better than – the power in your home.
Appliances which may not function properly, or which may be permanently damaged, without pure, smooth power will be safe with pure sine inverters. Use these inverters for televisions, laptops, digital microwaves, fridges, and other sensitive electronic equipment. Pure Sine inverters can power just about any AC appliance without risk of damage.
We aren’t going to talk about the first two.
Essentially, the power they make isn’t a clean power and can damage certain electronics.
I don’t like recommending products that have an inherent risk of damaging other equipment.
We are going to be looking for a pure sine wave inverter.
This inverter actually does the best job of making the same kind of power that is actually coming through a standard 110 wall plug.
The pure sine inverters come in sizes from small, portable, 300-watt models all the way up to 5000-watts. But to get by with modest usage like running a coffee pot, Instant pot, or induction stove, the most common size that I’ve seen and the size we have in our camper van, is a 2000-watt inverter.
But if you want to learn in more detail, how to accurately size an inverter for your setup, you can dig deeper on the internet.
Keep in mind when plugging into a campground power pedestal or even, simply a plug in at somebody’s house.
Yes, shore power is, basically, just an external plugin somewhere on the grid. You can get these in a separate unit, sometimes called a converter. But typically, it’s easier and it’s cheaper to just get the all-in-one inverter/charger combo package. They charge your batteries at a rapid rate. Anywhere from 40-70 amps.
You really just have to ask yourself, “What do I plan on powering and how much “like home do I want this to feel?”
That’s actually all of the major components in a camper solar setup.
But we have a lot more very small items that you’ll need to complete the build.
Wires, lugs, fuses, switches, breakers, and bus bars just to name a few.
The bus bar is an extension of your battery terminals. When we’ve got a dozen different wires and components that need to be connected to the battery directly, the top of the battery terminal can turn into a giant bird’s nest of wires in a hurry.
These just give you a little more room to work with your wiring and make it easier to see exactly what you’ve got going on and what wires are going where.
The battery monitor tells you the status of your batteries. Like, their capacity, their voltage, and how much power is actively being generated or lost. The monitor is able to tell us this information by the information provided by the. If the battery monitor is the brain, the shunt is the body.
The shunt is physically responsible of counting the amps that are either coming or going in either direction and reporting that to the battery monitor. The shunt sits in line of the negative battery terminal and the bus bar. All loads should be on side of the shunt that is away from the battery.
The fuse block is the easiest way to make fused connections to these low amperage devices and keep everything safe, tidy, organized, and safe.
So, now I guess we should talk about, Fuses are what protect your wires in case of an over-current situation, aka, a malfunction. If there are too many amps flowing through too small of a wire, or something is malfunctioning, the wire can melt and possibly start a fire.
Quick note, fuses and breakers are kind of, sort of, the same thing.
If a fuse blows, you can’t reuse it.
If a breaker, trips, you can just reset it.
And I kind of use those two terms interchangeably, depending on the situation.
Don’t let that confuse you, since they kind of do the same thing.
So, the fuse is designed to blow or trip at a current lower than the melting point of the wire.
Which will cut the flow of power, effectively shutting off the hazard.
There are three types of DC fuses that I find myself using.
Spade fuses, resettable breakers, and ANL fuses.
The type and size of fuse that I pick varies depending on how it’s being used, the current going through the wire as well as the size of the wire it’s attached to.
Wire lugs are the ends of the wires.
They let you make nice clean connections to the bus bars or distribution blocks. And they’re sized according to two measurements. They will have a gauge, which is the size of wire that the lug will fit on to, and it also has a stud size diameter.
Like quarter inch or 3/8 or the number eight which is the size of the bolt that the lug is designed to fit around.
Depending on the inverter/charger you get, it may or may not have come with an AC breaker installed.
If not, and you’re wanting to hard wire 110 volt plugs throughout your camper, you’re going to need to add an AC breaker.
You will need the breaker box, as well as a breaker to protect the wiring of your 110-volt circuits.
Keep in mind that you will most likely you are
Well you can see that there is a lot to learn and do when installing a solar system. Before trying to tackle the task by yourself make sure to do your homework. And that will include before you buy the product make sure the company will still be there for you to work out any problems. The worst thing is not to have any help to solve a problem.
Like I said in the beginning that this was going to be a brief over view on how to build a solar system for your RV. I hope this has help you on your decision on your system.
If you have any helpful tips, please put them in the commits to help others. If you think it will help someone else, please share to post.
Thanks, and good luck